
When it comes to Windows PC(s), Microsoft has launched much in-built software to ensure that windows run correctly. To the reader’s surprise, WMI Provider Host is one such software/program that keeps your computer system on track. However, unusually WMI Provider Host high CPU usage behavior can sign that applications in your system are not behaving in the right manner. Therefore, it is significant to fix WMI Provider Host High CPU usage; otherwise, it can silently kill your PC’s pace and lead it to collapse entirely with time.

To begin with, WMI means Windows Management Instrumentation. According to the reports, WMI Provider Host, or shortly known as WmiPrvSE.exe, is a feature that occasionally provides information to the applications/programs upon request. For instance, presuming that third-party apps on your windows PC demand RAM and ROM capacity, it will request the WMI Provider host for the information. More often than not, the subject of WmiPrvSE.exe rarely comes up among the users due to its limited and hidden use. Therefore, if you are here to read about the WMI Provider Host high CPU usage, it must be because something is wrong with your system, right?
Today, in this reading, we will discuss three ways to resolve the WMI Provider Host High CPU Usage issues in Windows computers. Moreover, you will also learn how to disable the WMI provider host? How to restart it?, and How to troubleshoot WMI? Hence, without any further ado, let’s get started:
How to Fix WMI Provider Host High CPU usage?
Table of Contents
The following are the three methods to fix this problem. You must not choose to use the following guide if the WMI provider host is acting correctly. Moreover, it is recommendable to check what applications are activated in the WMI provider host before troubleshooting it.
Other than high CPU usage, on the condition that your PC has been attacked by virus or malware infection. You can use the following solutions to detect which application is hosting such a virus or malware.
(METHOD 1): Restart WMI Provider Host
Do you remember? When a problem used to be with our smartphone or PC back in the years, our first go-to solution was “restart it!” Here as well, this trick will work. Check out the following guidelines for how to restart the WMI provider host?
- Go to the “Run box” from the start menu.
- Or, press Windows key + R.
- The search/run box will appear.
- Type “services.msc”
- Tap the ENTER button.
- Right-click on the “WMI” or “Windows Management Instrumentation” program.
- At last, select the “Restart” option.
Note: By doing this, the WMI provider host will drop all the requests, shut down, and restart. However, this is only a temporary solution. Therefore, there are chances that after some time, your WMI will start using CPU storage at a high pace once again. Thus, we are two other methods for you. Try now!
(METHOD 2): Use Command Prompt to Restart WMI
To begin with, command prompt or cmd.exe is one of the rarely used functions on Windows 10 PC. It is used to give impossible or challenging commands to fulfill a task immediately. For the most part, users are recommendable to use method 2 after trying method 1. For example, if by restarting WMI, the program is still using high CPU storage, then use the second method. Check out the following instructional guide:
- First, Open the “Run box.”
- Use Windows key + R shortcut key for a run.
- A search box will appear.
- Type cmd. (or, cmd.exe – for latest Windows 10 Pro by Microsoft)
- Now, use the shortcut key “CTRL+Shift+Enter.”
- Under the Programs, tap on the “Command Prompt” option.
- Now, tap on “Run as Administrator.”
- Command Prompt (Admin) will open up. (To verify, black background with codes).
- Now, enter the following command(s) one by one.
- Type command “net stop iphlpsvc” and press enter.
- Similarly, enter the next command, “net stop wscsvc.”
- The next command is “net stop winmgmt.”
Now that you have stopped all three elements of the WMI Provider host, it is time to give commands to activate.
- Now, enter the command, “net start winmgmt.”
- Type “Net start wscsvc” in the next command.
- At last, enter “net start iphlpsvc” and press the enter button.
Give 10 seconds for cmd.exe to restart all functions as commanded.
- Now, restart your Windows 10 PC.
- Test WMI Provider Host CPU usage (current status).
(METHOD 3): Disable the problematic program
Instead of resolving high CPU usage issues, users find it convenient to disable or uninstall the application/program, which is causing the main issue. For example, applications downloaded from unknown sources may request private information from the WMI Provider Host.
It will consequently increase CPU usage in order to convey the information successfully. Hence, the Windows 10 pace of functioning will slow down. Thus, it is best to disable or delete such applications. They are a threat to both privacy of users as well as the security of the system.
Check out the following instructions to do so:
- First, Open the “Run box.”
- Use Windows key + R shortcut key for a run.
- A search box will appear.
- Type “MSConfig”
- Tap the ENTER button.
- Observe the five different tabs on the top (general, boot, tools…)
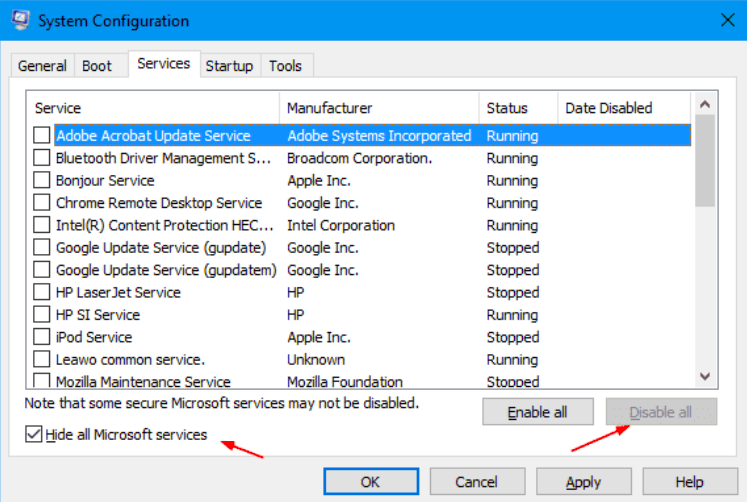
- Click on the “Services” option.
- Now, untick the “Hide all Microsoft services.”
- Then, on the right side, click on “Disable All.”
- Click on the “OK” button.
Wait! We are not done yet…
- Go to the “Startup” tab.
- Click on the “Open Task Manager.”
- In the task manager, go to the “startup” tab again.
- “Disable” all programs one by one or all together.
- Now, once again, restart your system.
Is your problem solved? If yes, this means that either one or a group of applications were causing the problem. In case it is not resolved, we have one last slotted solution for you.
(METHOD 4): Activate Event Viewer to find the source of the issue
To begin with, Event Viewer is one of the most effective programs available in Windows 10 PC(s). Using this program, you can review the last 10 or more events on your system. Check out the following instructional guide to stop WMI Provider Host High CPU usage by using the Event Viewer:
- Right-click on the desktop.
- Or, use Windows key + X shortcut key.
- Select the “View in toolbar” alternative.
- A dropdown box will appear.
- Tap on the “Event Viewer” option.
- If you cannot find it, you can manually open it in the WinX menu.
- Then, click on the “Show analytics and debug log” options.
- Moreover, tap on the “Applications and Services logs.”
- Then, click on “Microsoft” and choose “Windows.”
- Can you see the WMI activity option? If yes, click on it.
- Then, go to the “Operational Logs.”
- One or more items will be listed as “Error” because they are causing problems.
- In order to view the problem, click on “Specifications” for [error_program].
- Observe the five different tabs on the top (general, boot, tools…)
- First, go to the “General Tab.”
- Do you see ClientProcessId?
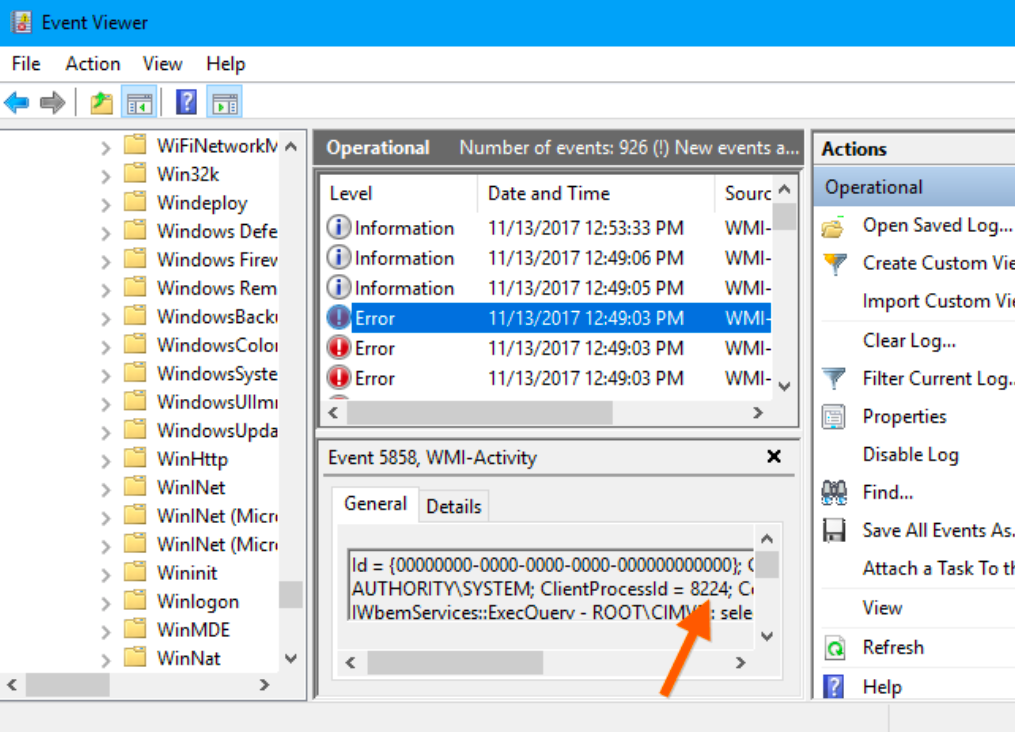
- Copy it or note it down somewhere.
- Now, either go back or open the task manager once again.
- In the task manager, go to the “Service tab.”
- Can you see the application/program with the same processId?
- If yes, click either disable or uninstall to quit or remove this program from your system.
Once you remove the problematic program, it will help your system to run peacefully again.
How to disable WMI Provider Host?
For the most part, WMI Provider Host high CPU usage indicates that one or many applications on your system cause problems. It may be because of malware infection, virus, or privacy threat. Thus, we recommend you not disabling the WMI host provider as it helps your Windows 10 PC to work properly.
Check out the following handy guide to disable or delete WMI Provider host from your system:
- First, Open the “Run box.”
- Use Windows key + R shortcut key for a run.
- A search box will appear.
- Type “wbemtest.”
- Right-click to launch/open it.
- In the namespace, type root or default.
- Tap on the “connect” option.
- Then, click on the “delete class” option.
- In the class name enter list, type the following:
- VirtualSoftwareSublayer
- VirtualSoftwarePackage
- AltirisVSProv
- Follow the commands to delete.
By doing so, particular features of WMI provider hosts will stop working. Thus, it will no longer convey information to applications on your system.
Is it safe to disable the WMI Provider host temporarily or permanently?
First of all, Windows 10’s WMI Provider host’s main job is to protect your system and keep its pace up. If you disable this program, there are chances that your system shows a blank screen or may not function at all. Thus, it would help if you took such a risk. Instead, we recommend that you disable or uninstall the application, causing problems as it is the root cause of high CPU usage.
Epilogue
We hope that the idea behind the launch of WMI Provider Host High CPU usage is resolved. If your system’s CPU is troubling through high usage, WMI doesn’t have to be the only problem. There are chances that your system is running out of RAM. In this case, we recommend you to check computer specs and delete apps with high storage.
Read here: How to check computer specs for Windows and Macbook?